Uploading Activation Maps#
As models continue to grow larger and more complex, it is increasingly difficult to understand the reasoning behind their decisions or predictions. Understanding why a model produced a specific output is a process called Explainable AI (XAI) and can help data scientists and engineers comprehend and trust model results.
There are many explanation methods for different model architectures. Most of the popular techniques used in computer vision workflows output a map that highlights regions in an image that are relevant to the model output. This map is called an activation map.
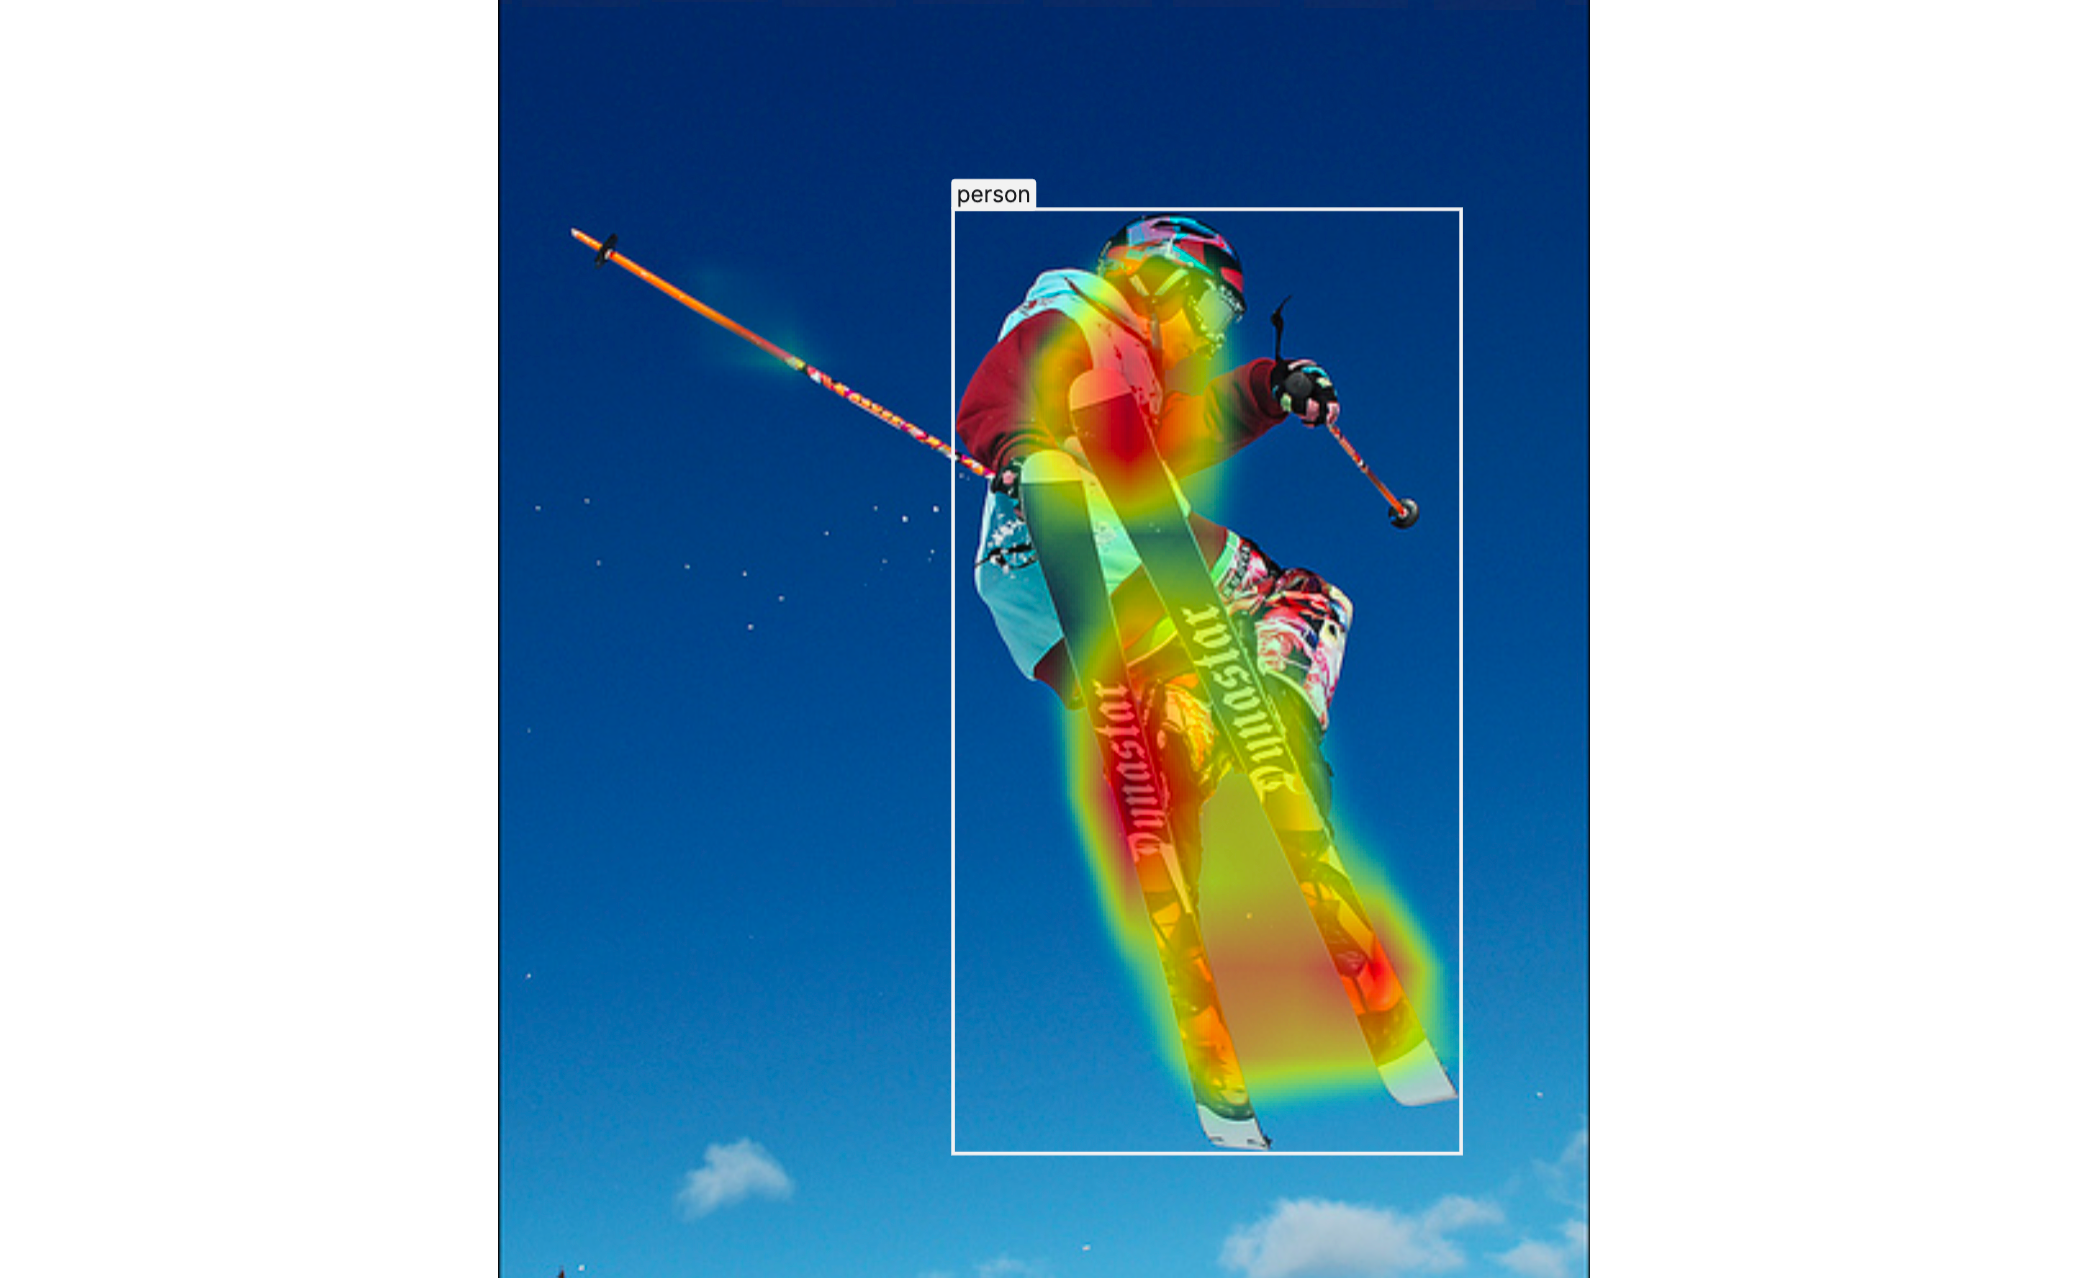
Visualization of an activation map overlaid on an image
Popular Interpretation Methods for Computer Vision#
There are various methodologies that facilitate and aid the interpretation of several computer vision models, and if you are interested in learning more about them, here is a list of some of the popular methods:
- Vanilla Gradient (Saliency Maps)
- Class Activation Mapping (CAM)
- Gradient-weighted Class Activation Mapping (Grad-CAM) — PyTorch tutorial
Can I Visualize Activation Maps on Kolena?#
Yes! Activation maps can be visualized as an overlay on the corresponding image in
BitmapMask
annotation type which can help us understand the model’s decision — what
the model “sees” when it makes its prediction.
In this tutorial, we’ll learn how to upload and visualize activation maps as a part of testing models on Kolena.
How to Upload Activation Maps on Kolena?#
Uploading activation maps to Kolena can be done in three simple steps:
- Step 1: creating PNG bitmaps from 2D array activation maps
- Step 2: uploading PNG bitmaps to cloud storage
- Step 3: updating inferences and running tests
Let's take a look at each step with example code snippets.
Step 1: Creating PNG Bitmaps#
The activation map is a 2D data array ranging from 0 to 1 with (h, w) shape. This array is converted to a PNG bitmap
using the following two utility methods:
colorize_activation_map: applies color and opacity to the input activation mapencode_png: encodes the colorized map into an in-memory PNG image represented as binary data
import io
import numpy as np
from kolena.workflow.visualization import colorize_activation_map
from kolena.workflow.visualization import encode_png

def create_bitmap(activation_map: np.ndarray) -> io.BytesIO:
    bitmap = colorize_activation_map(activation_map)
    image_buffer = encode_png(bitmap, mode="RGBA")
    return image_buffer
Activation Map Scaling
The activation map often has the equal dimensions (i.e., width and height) as the input image or sometimes has the scaled-down dimensions with the fixed ratio. Kolena automatically scales the overlay annotations to the images so there is no need to up-scale the map to match the image dimensions.
Step 2: Uploading PNG Bitmaps to Cloud Storage#
In order to visualize the bitmaps on Kolena, these bitmaps must be uploaded to a cloud storage first, and their locators
are used to create BitmapMask annotations. In this section, we will learn
how to upload the in-memory bitmaps to an S3 bucket. For other cloud storage services, please refer to your cloud
storage's API docs.
import io
import boto3
from urllib.parse import urlparse

BUCKET = "<YOUR_S3_BUCKET>"

s3 = boto3.client("s3")

def bitmap_locator(filename: str) -> str:
    return f"{BUCKET}/tutorial/activation_maps/{filename}.png"

def upload_bitmap(image_buffer: io.BytesIO, filename: str) -> str:
    locator = bitmap_locator(filename)
    parsed_url = urlparse(locator)
    s3_bucket = parsed_url.netloc
    s3_key = parsed_url.path.lstrip("/")
    s3.upload_fileobj(image_buffer, s3_bucket, s3_key)
    return locator
With all the building blocks we learned from Step 1 and
Step 2, we can now create a
BitmapMask with a given activation map.
from kolena.workflow.annotation import BitmapMask

def create_and_upload_bitmap(
    filename: str,
    activation_map: np.ndarray,
) -> BitmapMask:
    image_buffer = create_bitmap(activation_map)
    locator = upload_bitmap(image_buffer, filename)
    return BitmapMask(locator)
Step 3: Updating Inference and Running Tests#
Info
If you are not familiar with the workflow concept, please read the Building a Workflow guide.
For the purposes of this tutorial, let's assume we already have a workflow built, and we are going to upload
the activation maps as one of the fields in Inference.
All we need to do is to update the Inference definition to include a new field for the activation map:
from kolena.workflow import Inference as Inf
from kolena.workflow.annotation import BitmapMask

@dataclass(frozen=True)
class Inference(Inf):
    ...
    activation_map: BitmapMask
Info
If you are not familiar with how to run tests, please read the Step 4: Running Tests from Building a Workflow guide.
Before you run tests, make sure to update your infer function to return an Inference with the corresponding
BitmapMask as its activation_map field. You are now ready to run tests! Once the tests complete, we can now visit
Image data.
Conclusion#
In this tutorial, we learned how to upload activation maps to Kolena in order to visualize activation maps
overlaid on your Image data along with your ground truths and inferences.